Showing posts with label top tips. Show all posts
Showing posts with label top tips. Show all posts
Thursday, March 11, 2010
Wednesday, April 22, 2009
Buoyage - Cardinal Markers

Cardinal marks are used to indicate safe and deep water in relation to a hazard. The lighthouse authority will only place as many cardinal marks as are needed to mark the hazard in relation to the shipping channel, this is often only one. There are various ways of recognising the various buoys, the first method is the cones placed on the top - the North and South cone’s point in their respective directions. The west cones, some say looks like a wine glass hence west or a ‘W’ if it was lying on its side and the leftover one must be East! The other ways of recognising the different buoys are their colour banding (look closely and compare them) and their lighting pattern, which is like a clock.


Wednesday, April 15, 2009
Buoyage - Safe Water & Isolated Danger

A Safe Water Mark, as defined by the International Association of Lighthouse Authorities, is a sea mark used in maritime pilotage to indicate the end of a channel implying that open, deep and safe water lies ahead. The marker is also sometimes known as a Fairway Buoy.
Safe Water Marks are painted half red and half white, vertically, and commonly bear a top-sign in shape of a red ball. Lighted buoys flash white either morse code 'A', isophase (Iso), occulting (Occ) or single long flash every 10 seconds (LFl 10s).
 An Isolated Danger Mark, as defined by the International Association of Lighthouse Authorities, is a sea mark used in maritime pilotage to indicate a hazard to shipping such as a partially submerged rock. It is recognisable by its black and red bands and top-mark of two black balls. A light, when fitted, is white showing groups of two flashes (Gp Fl 2).
Safe Water Marks are painted half red and half white, vertically, and commonly bear a top-sign in shape of a red ball. Lighted buoys flash white either morse code 'A', isophase (Iso), occulting (Occ) or single long flash every 10 seconds (LFl 10s).
 An Isolated Danger Mark, as defined by the International Association of Lighthouse Authorities, is a sea mark used in maritime pilotage to indicate a hazard to shipping such as a partially submerged rock. It is recognisable by its black and red bands and top-mark of two black balls. A light, when fitted, is white showing groups of two flashes (Gp Fl 2).
Wednesday, April 08, 2009
Buoyage - Lateral Markers
 Photograph: Pesda Press
A lateral buoy, lateral post or lateral mark, as defined by the International Association of Lighthouse Authorities, is a sea mark used in maritime pilotage to indicate the edge of a channel.
Each mark indicates the edge of the safe water channel in terms of port (left-hand) or starboard (right-hand). These directions are relative to the direction of buoyage; this is usually a nominally upstream direction. In a river, the direction of buoyage is towards the river's source; in a harbour, the direction of buoyage is into the harbour from the sea. Where there may be doubt, it will be labelled on the appropriate chart.
A vessel heading in the direction of buoyage (eg into a harbour) and wishing to keep in the main channel should:
* keep port marks to its port (left), and
* keep starboard marks to its right.
For historical reasons, two different schemes are in use worldwide, differing in their use of colour.
Previously there had been 30 different buoyage systems, prior to IALA introducing the rationalised system.
The IALA defines them as System A and System B:
* System A is used by nations in Europe, Australia, New Zealand, parts of Africa and most of Asia other than the Philippines, Japan and Korea.
* System B is used by nations in North America, Central America and South America, the Philippines, Japan and Korea

Friday, August 17, 2007
Top Tips - Wikipedia

Where do you turn to these days when looking for some illusive bit of information or just want to get the low down of an old pop group you used to like in the '80's? That superb web based resource know to most as Wikipedia , of course.
More often than not I drop by Wikipedia and therein can be found the much coverted answers (as long as someone has taken the time to create an entry). If you are prepared to accept the the knowledge available isn't definitive or entirely accurate (as the idea of a wiki is that nayone can edit it and not everything wriiten can be guaranteed 100% true or correct) then Wikipedia is goldmine.
Wikipedia, naturally, has useful facts and figures about itself........As of August 14 2007, Wikipedia had approximately 7.9 million articles in 253 languages, 1.95 million of which are in the English edition. It has been written collaboratively by volunteers around the world and the vast majority of its articles can be edited by anyone with access to the Internet. Steadily rising in popularity since its inception, it currently ranks among the top ten most-visited websites worldwide. Wikipedia's name is a portmanteau of the words wiki (a type of collaborative website) and encyclopedia.
There are flaws, as with any innovative system, but for me the pros outway the cons. Every day, almost, I discover something new and have even added to a few pages. I just think its great that in 21st Century that we can all begin to more freely share we individually know and this can be accessed by many all over the world. Here to a great knowledge transfer medium.

Friday, August 10, 2007
Top Tips - Travel Light

When you're camping from your kayak, take as little as you think you can comfortably manage with. The less you have with you, the quicker it is to find things and the less effort you'll need loading, unloading, carrying and setting up. That doesn't mean you have to forego taking your water-color paints! But really, how many changes of clothing do you really need?

Photo: Photo: Simon Willis
Friday, August 03, 2007
Top Tips - Fog Happens!

A true story! It had been a sunny day and they ate lunch lounging on the springy grass and enjoying the scent of wild flowers in the sun beneath a whitewashed stone wall by a lighthouse. But when they stood to walk back down the island to their kayaks they realized the sea was gone, covered in a dense fog. From up on the island they could see the next headland jutting up out of the fog but nobody in the party had a compass. They were stranded until the fog thinned in the evening, or at least that was their excuse! Carry a compass, and at the very least learn how to take a simple bearing and how to follow it. If you know land is "sort of to the east", that could be enough to get you to shore in event of fog. Otherwise, well, you could be late for tea!
Friday, July 13, 2007
Top Tips - Skegs

Photo: Geoff Murray
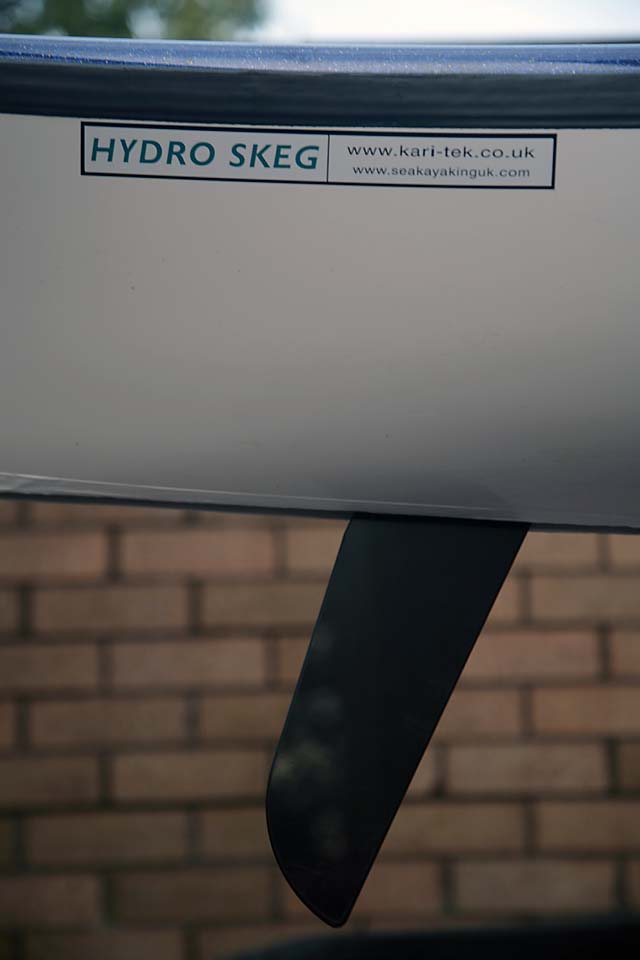
A skeg is a fixed rudder that protrudes down from the keel near to the stern of a boat to help it run straight. Kayaks are often fitted with a retractable skeg that can be hoisted into a slot in the hull under the stern. The kayak will be most manoeuvrable when the skeg is fully retracted. Dropping the skeg a little will help prevent weather-cocking (undesired turning to face the wind) and when fully dropped will make it easier to turn to face away from the wind. To face the wind you'll need to raise the skeg completely. A skeg is normally adjusted from the cockpit by cable slide or line and cleat at cruising speed because the effect at speed will be different from the effect on a stationary or slow-moving kayak.

Photo: Douglas Wilcox
Friday, July 06, 2007
Top Tips - Using a Tow-Line

Photo: Adriam Trendall
The occasional use of a tow-line has made many a journey more comfortable, and many a situation safer. But how long should a tow-line be? If you're paddling on calm water with no wind then a tow-line should be long enough for following kayak to be clear of the stern of the one towing. If you're towing with the wind and waves at your back the line should be long enough for the person towing to avoid having the following kayak ride a wave into them. If there are only two of you and the person needing a tow is feeling unstable, then the line needs to be so short the person being towed can hold the stern of the other kayak for support.

Photo: Adriam Trendall
These examples give an indication of the extremes you might meet. You can cope with most situations with a line 15 metres long, but you might consider some extra line you can quickly add for use in a following sea and a really short tether for close tows.

Photo: Adriam Trendall
Friday, June 29, 2007
Top Tips - Taking Breaks

Paddling a long distance along a shoreline that doesn't change much, or across a big body of open water can get boring. Boredom often translates into feeling uncomfortable, making you take more stops for food or water. If you're in a group there's a tendency for each person to take a break at a different time and this can severely slow the progress of the group. So decide how often you all need to take a break and then stop together for regular timed breaks. For example this might be a five minute break every hour, starting on the hour. That way everyone can anticipate the break, and it's easier to push on knowing exactly how long you've got left till your next break.

Friday, June 08, 2007
Top Tips - Slow Down

Trying to master a new technique? Slow down! Most paddle strokes and their associated movements can be done slowly, even the components of a roll. By practicing the movement in slow motion you can focus on the minutiae without disrupting the flow. Then when the detail is correct, you can gradually speed up. A lot of strokes work best when performed fairly slowly, and precision is more important than speed anyway.

Source: Nigel Foster
Friday, June 01, 2007
Top Tips - Launching Locations

It's surprisingly easy to head out from shore on a day-trip without a backward glance, only to struggle to find the place you launched from when returning. Whenever you set off from a new location, remember to look back frequently to see what the launch place looks like from the water. As you paddle further away different landmarks that are not visible from close to shore can slide into sight. When you return you can use the same visual clues to approach the general area, then pick up on the detailed visual clues to guide you back to your landing. Bear in mind too that a falling or rising tide can change the appearance of a coastline, and may turn your cliffs with water lapping at the base into broad stretches of rocks and sand with cliffs rising from the sand hundreds of yards from the water. Refer to your chart to determine what the coast will look like at high and low water before setting off. That way you won't be have that unpleasant surprise upon your return. Remember also, in some places the shore at low tide dries out considerably from the high water line making for a very different place indeed!
Friday, May 25, 2007
Top Tips - Wildlife Watching

One of the reasons people paddle on the sea is to watch wildlife. So be aware of the needs of the creatures you like to watch. Seals and sea-birds often hang out on rocks and ledges. Some sea birds socialise in rafts out on the water. Sea birds often cluster on cliffs to nest. Watch the change of behaviour of birds and animals as you approach. You'll see them become alert to your presence. If you move closer they'll show restlessness and maybe agitation, before they finally flee. If you're aware of the pattern, try to watch and pass by at a distance that doesn't disturb. Although there are many reasons a colony of birds will take flight from their nests, the more frequent the disturbance the more likely the breeding season will fail. So if you're out for the fun of weaving your way along a coastline between stacks close to the cliffs, avoid the locations where there are a lot of birds, or a lot of seals. There are usually plenty of alternative play spots. If you're out to watch the birds and seals, seek a quiet spot where you can watch without causing disturbance.
Photo: Rolf Hicker
Friday, May 18, 2007
Top Tips - Reading Charts

Photo:Cailean Macleod
Want to start learning about charts the easy way? Chart 5011, Symbols and Abbreviations used on Admiralty Charts is the booklet containing the key to the symbols you'll find on nautical charts. It shows international symbols for buoys, not only on UK charts but around the world. If you're interested in sea kayaking and have never used a chart, I recommend you buy a chart of the area you visit or intend to visit most often, (your "local" one) and then a detailed chart of an area that excites your interest; maybe some part of the Aleutian Islands, or the Bahamas, perhaps Wales or New Zealand, if that's not your local area. This is your "dream" chart. Add a copy of Chart 5011, and a set of local tide tables.

Start with the your local chart and use Chart 5011 to help you identify the symbols on it. Some of the features won't seem very useful to you, like maybe the nature of the sea bed some 150 feet beneath you, so note the ones that you're likely to be able to see such as prominent land features, rocks that are exposed at low tide, buoys and lights. Once you've learned more about what the symbols mean, use your "dream" chart to plan sample day trips, and note where the areas of potential danger are, such as tide races, kelp beds, steep cliffs and rocks that cover at high tide.
There's nothing really complex about charts. A little curiosity and you'll soon uncover all they can tell you!
Friday, May 11, 2007
Top Tips - Edging
Practice and experiment with your edge. Mastering edge control will improve your paddling. With the boat flat this gets a score of zero. Try then increasing the edge in three stages 1,2,3 and get used to holding the boat still on edge at each of the levels. Next you can try going smoothly from edge to edge e.g. edge 1 on the left to edge 2 on the right. You can do this either statically or on the move. Finally try turning the kayak in a number of ways using inside or outside edge or even keeping the boat flat. Try spending about 10 -15 minutes on this exercise and revisit it each time you go on the water.

Saturday, May 05, 2007
Top Tips - Gel-coat Repair

Photo: Brian Nystrom
Your glass-fiber kayak is looking a little scratched and scuffed? If it's the hull the appearance is not so important, so long as the gel-coat is intact. After all, you bought the kayak to use it, right? But if you've worn through the gel-coat then you need to repair it with a top-coat of gel-coat to seal the wear-point or the exposed glass fibres will begin to soak up water, deteriorate and also add weight to you kayak. The deck? Maybe you'd like to tidy away the scratch marks where you've scuffed it with your paddle, or the marks your spare paddle has made on the back deck. These you can tackle with a soft cloth and a rubbing compound or grinding paste from your local auto repair shop or glass-fibre dealer. Used for bringing paint to a high gloss, this works great to buff the surface of your kayak to a glowing shine again. All you need is some elbow power and some patience.

Photo: Brian Nystrom
You can learn about attending to more serious repairs to boats at Adam Bolonsky's blog
Friday, April 20, 2007
Top Tips - Paddles
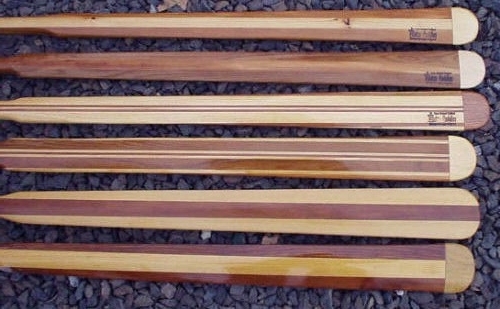
To really understand paddles you need to experiment a lot with different variables; different lengths, degrees of blade stiffness, blade widths areas and shapes, and also paddling styles. The more you understand, the easier it will be for you to choose a paddle and paddling style that suits what you want to do, and the better you'll be able to use your paddle.

Try a different type of paddle from the one you usually use. Borrow a wing for a while, or a Greenland paddle, or a general touring paddle, whichever is the least familiar to you. If you have an "high angle" paddle style, experiment with a paddle designed for a "low angle" of presentation. Compare the effectiveness of your usual stroke with the effectiveness of a "low angle" stroke.

Learn more about the effect of "swing weight" by attaching a weight to each of your paddle blades. (use elastic bands to hold a small zip-lock bag of water to each blade) You should notice a big difference when you move the weights toward the mid-point of the shaft, so you can figure out for yourself how you prefer the weight to be distributed in a paddle. Take a length of bamboo and use that as a paddle. How does this affect your acceleration and your top speed? When do you experience the greatest amount of flutter, when you're accelerating or when you're cruising?

Curiosity and experimentation can teach you a lot!
Source: Nigel Foster

Try a different type of paddle from the one you usually use. Borrow a wing for a while, or a Greenland paddle, or a general touring paddle, whichever is the least familiar to you. If you have an "high angle" paddle style, experiment with a paddle designed for a "low angle" of presentation. Compare the effectiveness of your usual stroke with the effectiveness of a "low angle" stroke.

Learn more about the effect of "swing weight" by attaching a weight to each of your paddle blades. (use elastic bands to hold a small zip-lock bag of water to each blade) You should notice a big difference when you move the weights toward the mid-point of the shaft, so you can figure out for yourself how you prefer the weight to be distributed in a paddle. Take a length of bamboo and use that as a paddle. How does this affect your acceleration and your top speed? When do you experience the greatest amount of flutter, when you're accelerating or when you're cruising?

Curiosity and experimentation can teach you a lot!
Source: Nigel Foster
Friday, April 13, 2007
Top Tips - Gaining Balance

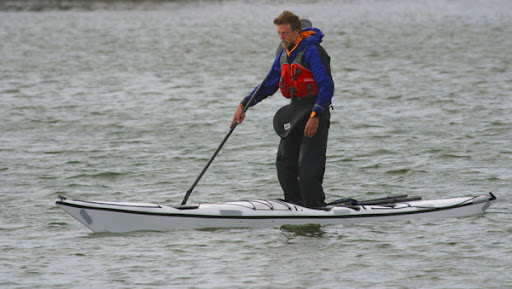
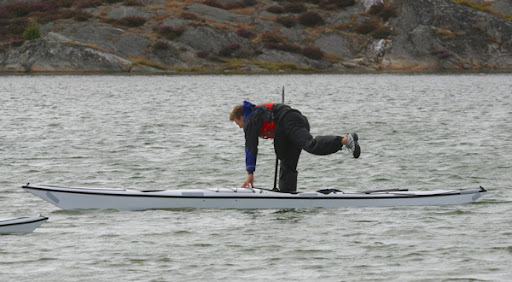
Reactions get quicker with practice. So your ability to balance gets better too, because you react more quickly to shifts of balance. But you don't make big improvements in a stable kayak on flat water. If you want to stretch yourself, try something a little less stable, like a down-river racer, a sprint kayak or a surf ski, or one of the narrower sea kayaks. Try a tippier kayak in choppy water. Try standing in your kayak. Ultimately being able to balance a kayak in a relaxed way is less to do with tight thigh-braces and a lot of grip, it's more about letting go completely with your knees, relaxing your body, maintaining power on your blade and keeping contact with your kayak through your feet and seat. Keep your weight focussed on a narrow line down the center of your kayak, and let your weight shift sideways from your middle while your head stays above your seat. If you try to grip tightly in a tippy kayak you'll wobble like crazy. Keep your knees together, relax, and you'll balance more easily.

Source: Nigel Foster
Friday, April 06, 2007
Top Tips - Is Colour Important?
Are you more visible in some colour kayaks than in others? Yes, but which colours are most visible? Well it's generally accepted that the part of the spectrum from red through to yellow offers high visibility, Our eye sees these colours more quickly than others. And a light, pigment-rich opaque colour is much more visible than a dark or translucent one. But there are some surprises. Pale blue, and teal green for example often show up really well on the sea because they contrast with the natural colors. Fishermen often like black fishing floats because they show up really clearly in some conditions, and white can be strikingly more visible than other colors at a distance when there aren't too many white-caps around. So if you want your kayak to be easily visible, go for a bright pigment-rich opaque color that contrasts with the waters you expect to paddle. That'll give you plenty of options so you can pick a colour you'll be happy to identify with.
Source: Nigel Foster
Subscribe to:
Posts (Atom)

